It is a common problem with WordPress. You started creating your first website and found a proper hosting company. You have bought a nice theme, installed some plugins and created a beautiful homepage full of images. But your website loading speed is horrendous.
That is because out of the box, most WordPress themes and plugins are not optimized for loading fast. Moreover, most images you’ll upload are optimized neither. And there you are, your website loads like a slug.
Luckily, this can all be improved. And it’s not that hard. Stay tuned.
A Fast WordPress Website is important
Nobody likes a slow WordPress website. But why is optimizing your website for speed so important? Basically, there are two factors which, in my opinion, are essential:
- Your website may do better in Search Engines, such as Google. One of the authorities on Search Engine Optimization (SEO), called Moz, describes that Site Page Speed is one of the ranking factors that Google uses for ranking. The author one of the most famous WordPress SEO Plugins confirms that a slow WordPress website will probably rank worse. Please note that good content and keywords are, however, still much more important!
- Visitors will stay on your website and visit more pages. In other words, when you have a slow website, the bounce rate will go up. The bounce rate is a metric which shows how many of your visitors will leave your website after visiting just one page. And yes, this number increases significantly for websites with a slow page loading speed. In most cases, you want your visitors to stay longer on your website.
- Moreover, a faster page will have significantly higher conversion rates. While not directly attributing to search engine optimization, it is an important on-site factor.
The Essential Steps for WordPress Speed Optimization
But let’s cut the crap and talk about what you’re really here for. The essential steps for optimizing your slow WordPress website. In my opinion, the following 5 steps are essential:
- Choosing a good WordPress Hosting Company
- Optimizing your images
- Minifying and concatenating your stylesheets and scripts
- Using different forms of caching
- Cleaning up your database
- Bonus: Enabling a Content Delivery Network (CDN)
- Bonus: Analyzing your website
I will close the topic with some more advanced tips on how to analyze a website speed and apply targeted optimizations. But hey, let’s go speed up WordPress!
TL;DR
Yes, I am lazy too. If you don’t want to read this article, you could do the following steps. Otherwise, you can skip this least and go to all the detailed goodness.
- Make sure your website is running on good hosting – it is a major factor. We’re content with Cloudways, Siteground or Kinsta. You can check your hosting with the WP Hosting Performance Check plugin.
- Log in to your WordPress website Admin Dashboard
- Go to the Plugins Page, click add new, then add the following plugins: Shortpixel Image Optimizer, a3 Lazy Load, W3 Total Cache, WP-Optimize and Autoptimize. Active these plugins, with the exception of Autoptimize.
- First, go to Settings in your WordPress Dashboard Menu, then Shortpixel. Add your API key. Get your image compression API key here.
- Go to Media, make sure it is in list view. Select all your images and choose to Optimize with Shortpixel from the Bulk Actions dropdown on the left. Let it optimize all the images.
- Go to the Performance tab in your WordPress Dashboard Menu. It’s down on the left. These are the options for the W3 Total Cache Plugin. Then, click the General Settings Item.
- From the General Settings Page, enable page caching. In the Dropdown menu underneath, choose for Disk Enhanced (or Memcached/Redis if available).
- Scroll down to minify. Enable it and accept the warning.
- Scroll down to object caching. Set it to disk, or if available to Memcached or Redis. Hit Save Settings & Purge Caches.
- Now go to the Minify, from the items under Performance on the left.
- Under HTM & XML, enable and also enable inline JS and CSS minification.
- Under JS, enable JS Minify settings. Also, enable HTTP/2 if possible.
- Under CSS, enable CSS Minify settings. Also, enable HTTP/2 if possible. Hit Save Settings and Purge Caches.
- If your website looks weird now, disable minification from the General Settings tab under Performance. Then, activate the Autoptimize Plugin. Go to Settings, then Autoptimize under Settings. Thick the three boxes for HTML, JS and CSS minification.
- Deactivate and delete any unused plugins and themes.
- Click on WP-Optimize from the WordPress Admin Dashboard menu on the left. Scroll down to scheduled clean-up settings and enable scheduled clean-up and optimization. Make sure you also thick Remove expired transient options. If you want to optimize immediately, go to the Database tab on the right top, select everything and hit Run all selected optimizations.
- Enjoy a faster website!
- Bonus: Enable a CDN. Go to cloudflare.com, create an account and connect it to your domain following the instructions of
CloudFlare . - Bonus: If you want to delve further into the speed of your website, use tools such as Pingdom to analyze the speed. To analyse the impact of your themes and plugins, use WordPress plugins such as UsadeDD and Query Monitor to analyse your website. But beware, this is more advanced stuff!
The above is still quite a read. But it summarizes what you have to do to speed up WordPress.
A test case using a slow WordPress website
What is an article about WordPress speed optimization without a test case? For this article, we have used a demo WordPress website for an
Choose Reliable and Fast WordPress Hostin g
The first thing you want to do is to ensure that you’re website is running at a fast WordPress website hosting company. For those who don’t know, a hosting party enables you to have your own website running on the internet, on their datacenters.
Now, you might often find various articles on the web promoting Bluehost, HostGator and other similar hosting parties. These parties are inexpensive, but they generally offer poor performance.
Fast WordPress hosting is in many occasions a major factor of WordPress speed optimization. This is especially the case if you’re gaining more website visitors. Do you want to know what the best performing hosting companies are? You can find a good host in our growing database of WordPress Hosting Reviews.
What we find good WordPress Hosts
Luckily, there are a number of WordPress which still deliver proven quality and are affordable. We have good experiences with Siteground (for starters), Cloudways (for techies, read a full review) and Kinsta (for anyone, read the full review here).
If you want to check if your current host is keeping up with the fast boys, you can use the WP Hosting Performance Check plugin. Just add it through your WordPress Dashboard under Plugins.
This WordPress plugin will add various options to analyze the loading speed of your website and the performance of the host. Make sure everything is in the green values. Values in the red may indicate you have a slow WordPress website.
There are also many others we may help you find good hosting. Usually, I find these hosting reviews sometimes a bit shallow, but our friends from MatthewWoodward did an outstanding job with their latest article on Fast WordPress hosting.
So, let’s continue with the real deal! Go to the WordPress website that you want to optimize and login to your Admin Dashboard. I will start with optimizing images first.
What to look for with WordPress hosting
Many times, it is difficult to choose a good hosting party. Partly because hosting parties often use many technical terms. When reviewing hosting parties, I often look at the following factors.
- The features: does the hosting offer what you need? Think of enough disk space and visitors, but also e-mailboxes or a development environment for WordPress.
- The speed: does the hosting party use terms such as caching, Redis and Varnish? Or do they talk about speed? That may be a good sign!
- The usability: sadly enough, you only know this if you are going to use a hosting party. International parties such as Kinsta often excel in usability.
- The support: does the hosting party have a knowledgebase? And do they have live chat, tickets and a telephone number? Good and fast support is important if you have questions and do not want to lose time!
- Security: does the party talk about firewalls, keeping files up to date, and monitoring hackers? A good sign
! Th e price: Last but not least, is it a good price for what you get? Too cheap is often bad, but there are exceptions.
In addition, you want a good domain name provider – a factor that also contributes to the speed and security of your website. DNS Made Easy (in combination with Domains Made Easy) and Cloudflare (soon…) are two of the big kahuna’s out there.
Location is a big deal
I just have to add one thing: you have to make sure a server is located close to where your visitors are. A website that is hosted in a data centre far away, takes a lot longer to load.
So are your visitors mainly from the United States? Choose a host that has servers in the United States. Do you have international visitors? You might consider a content delivery network (CDN).
Optimize Your Images by Compressing and Lazyloading
In many cases, images form the major part of your website from the perspective of file size. If you have many large images on your website, someone needs to download them all upon the first visit! As you can imagine, it can result in a slow WordPress website. If you can solve this, a website will load significantly faster for first-time visitors.
Gladly, there are two techniques which can help with optimizing your images. The first one is called Image Compression, and the second one is called Lazyloading. Let’s dive into the first one.
Image Compression with Shortpixel
Image Compression is a technique that decreases the file size of your images with a minimum loss of visual quality. In other words, your images will still look good and sharp but will be a lot fewer kilobytes.
I found out that Shortpixel is one of the better performing Image Optimization services, and they have a plugin for WordPress. So, head to Plugins in your WordPress Admin Dashboard, Add a New Plugin and search for Shortpixel. Install and activate this plugin.
Subsequently, go to Shortpixel Settings page. It is placed under Settings > Shortpixel in your WordPress Admin Dashboard Menu. You will get a screen where you can enter an API Key, which you can retrieve by signing up at Shortpixel’s website or adding your email address. The good thing is that you can optimize up to 100 images free per month.
After you have retrieved your API key, enter it and hit Save Changes. Then, go to Media (on the left top of your WordPress Admin Menu). Change the view to list view, select all images. Then, from the dropdown menu for Bulk Actions, on the left above your media items, click Optimize with Shortpixel and Apply. If you have many images, you could also go to Media > Bulk Shortpixel to optimize all images at once.
Now, you will see all images being optimized within your media library. In some cases, optimizing images may shave up to 90% of the original file size. Now that your images have been optimized, let’s talk about lazy loading!
Lazy Loading Images
Lazy loading is a technique whereby you only load the images that are visible at the screen of your computer. So, as you scroll down a website the images are loaded, but note before. That also can save quite some kilobytes upon first loading a page, especially if it has a lot of images further down the page.
The Lazy Loading images technique is really easy to set-up in WordPress. Just go to Plugins in your Admin Dashboard, click Add New and search for a3 Lazy Load. Install and activate this plugin. You’re done! If you want to change settings, these can be found under Settings > a3 Lazy Load.
Minifying Scripts and Styles
Wow! We’re getting quite technical now. For that reason, time to explain some terms. Minification is a technical term for decreasing the size of scripts and styles. Minification is also often considered the addition of several scripts or styles into a single file. But actually, this is called concatenation.
By these processes, the number of requests and the actual size of your website decrease. And this results in faster loading. But what are these scripts and styles?
What are scripts and stylesheets?
Your WordPress themes and plugins add scripts and styles to your websites. These are actually JavaScript files and CSS Stylesheets. JavaScript is a programming language and is used to add dynamic functionalities to your website. Think of pop-ups and sliders
On the other hand, CSS Stylesheets are files that determine how your website looks like. The colors used, the typography, the dimensions of your layout are all defined in a CSS Stylesheet.
Now many WordPress themes and plugins add a lot of these scripts and styles to your website. The result? Your website will load slower. Let’s solve that and speed up WordPress.
Let’s minify
So how can we apply minification for WordPress? Go to your plugin section in your admin dashboard, click add plugin and search for W3 Total Cache. This is one of the most widely used performance plugins for WordPress. Add and active this plugin.
After activation, a menu-item with Performance will appear in your WordPress dashboard. Click on it, then go to General Settings. Scroll a bit down until you see minify. Activate it (you will get a warning).
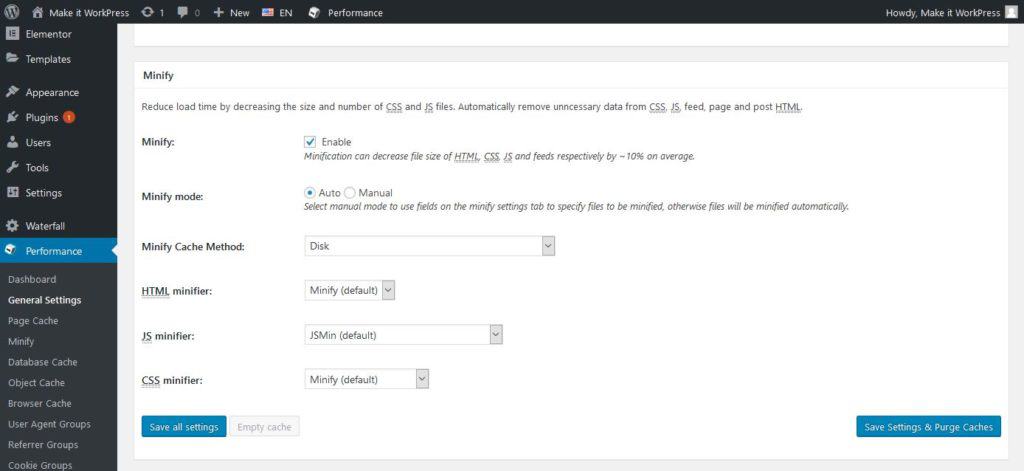
Now, click the Minify menu from the WordPress menu in the left. Then, you will arrive at the detailed settings for minification. Thick the following options:
- HTLM&XML: Enable, Inline CSS, Inline JS Minification
- JS: Enable, Enable HTTP/2 Push if possible
- CSS: Enable, and also Enable HTTP/2 Push if possible.
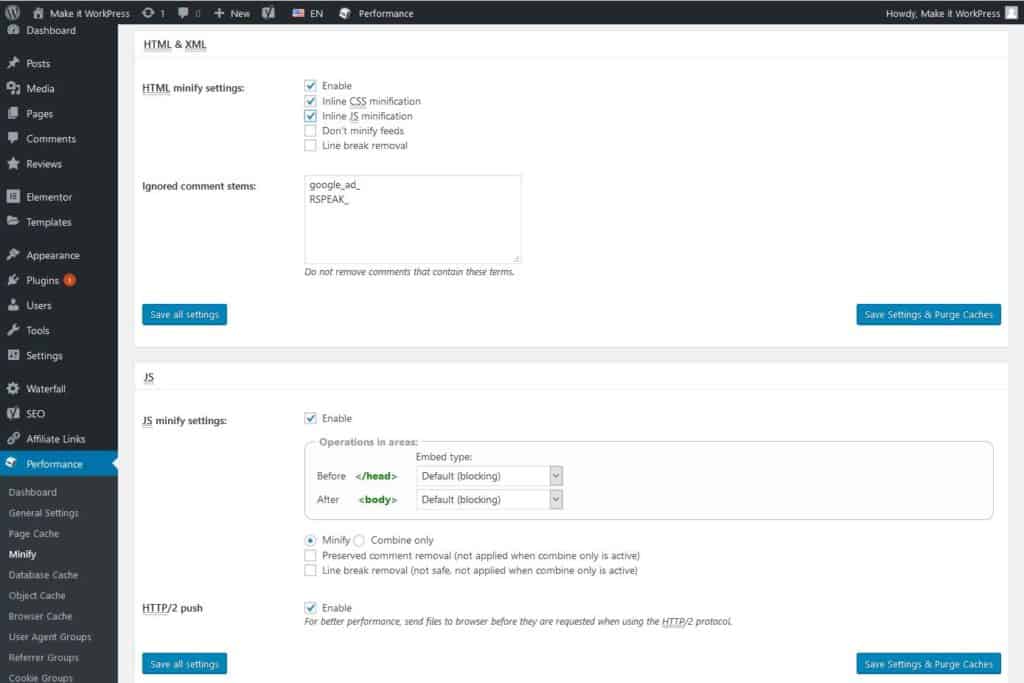
Now hit Save Settings & Purge Cache. And tada, minification is done!
Oops! My site looks weird now
Sometimes, the minification settings from W3 Total Cache can break your website. The layout will show strange errors, or functionalities such as pop-ups don’t work anymore. So first, disable minification in the settings of W3 Total Cache.
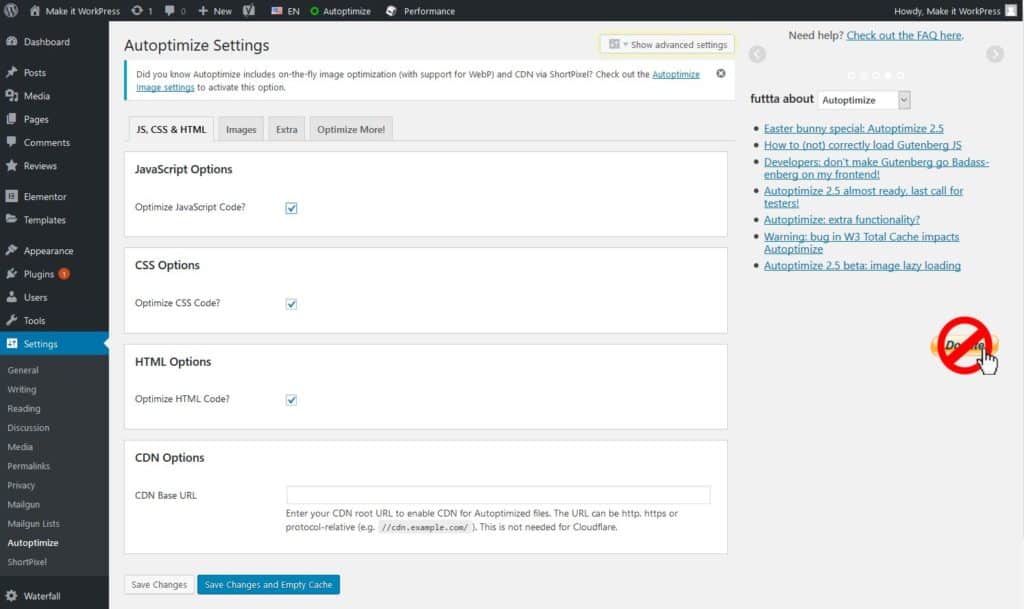
Fortunately, there is another plugin which in almost any case will minify your assets properly. This plugin is called Autoptimize.
You can just install this by adding this plugin through your WordPress Dashboard, as you would also do with other plugins. In your settings admin menu, a new item called Autoptimize will be added. Now, just thick the three options for minification, hit save, and you’re done!
The reason why we first try to minify with W3 Total Cache is that we also want to reduce the number of plugins running on the website. Now, that we have minified our assets, we are ready for the next step: caching!
Using different Forms of Caching
Caching, caching, caching. You may have heard about it. But what exactly is caching? There are actually different types of caching. These are the most common:
- Browser caching: your browser can save (or cache) files
temporary on in its cache your computer, such as images. Upon successive visits, these images are loaded from the cache instead of the website itself. - Page caching: each time a visitor visits a page on
WordPress website, this page is dynamically generated by the server. With Page Caching, this page is generated beforehand (or at first visit). Subsequently, this static copy is served to the visitor from the cache. - Object caching: a website makes queries to the database. Object caching saves common queries to its cache. Subsequent queries are then retrieved from this cache, saving a lot of real queries.
- Reverse Proxy: A reverse proxy serves a generated copy of a page, similar to page caching. From a technical perspective, it serves it before your web server. Varnish
caching is a well-known example of this type of caching.
Caching can greatly improve the speed of your website. But more important, it can also greatly improve the number of visitors your website can handle. As a result, it also makes hosting companies happy :).
Let’s cash cache!
A faster WordPress website can drive up your revenues depending on what kind of site you have. But let’s go back on track. Using W3 Total Cache can be overwhelming the first time. Actually, there are just a few settings you need to set-up for proper caching.
Did you remember? We activated W3 Total Cache already to enable minification. So, go to the General Settings item under Performance from your WordPress Admin Dashboard menu on the left.
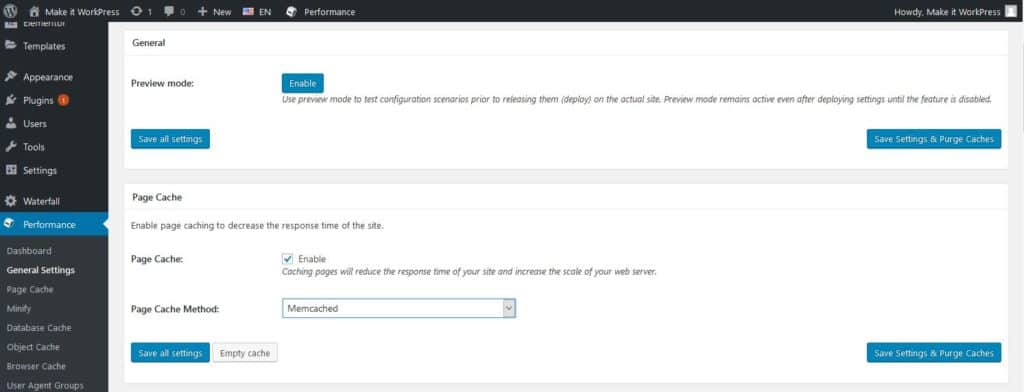
In this screen, you can see the various types of caching I introduced earlier. Scroll to the Page Caching Section, and enable it. From the dropdown field in this section, choose either Disk Enhanced or Memcached/Redis if possible. Not all hosts support Memcached or Redis, so it may not be available. If it is available though, you should choose either of them for best performance.
Subsequently, scroll to the Object Caching and enable it. From the dropdown menu in this section, choose Redis or Memcached if available. Otherwise, choose disk. Hit Save Settings and Purge Caches.
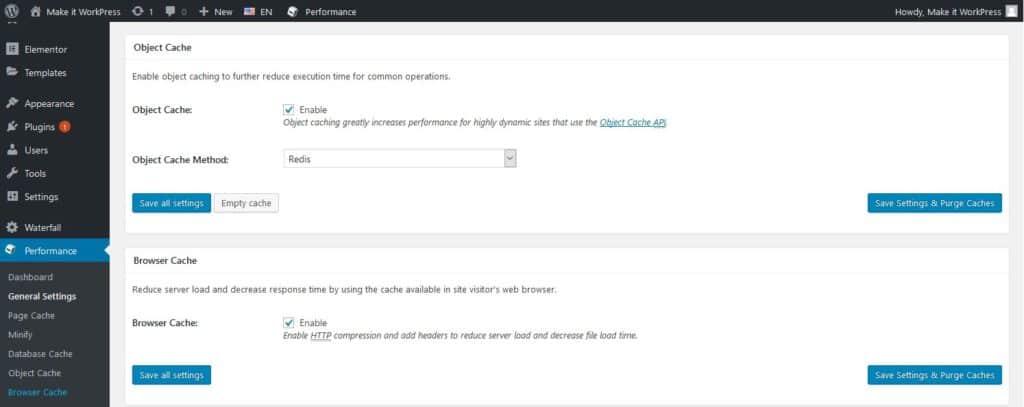
As you can see, there is also a Browser Cache section below the Object Cache setting. By default, this is already enabled.
If your hosting company supports Varnish, such as Cloudways, please add the local address for Varnish under the Reverse Proxy section. In many cases, the local address will be 127.0.0.1. Also, thick Enable reverse proxy via Varnish.
Alternatives to W3 Total Cache
There are numerous alternatives to W3 Total Cache which can greatly improve the speed of your WordPress website. Some examples of them are:
- WP Rocket: A paid plugin which is very easy to set-up and also includes Lazy Loading and Database Optimization.
- WP Supercache: A page caching plugin. Does not include minification.
- WP Fastest Cache: A comprehensive caching and minification plugin.
- If you are using Siteground as a host, you may use their own SG Optimizer plugin. It works great together with the Autoptimize plugin.
Cleaning up your Database and WordPress Installation
There are a couple of other factors that influence the speed of your WordPress website, especially if you are logged in to WordPress. Unfortunately, you can not cache everything.
Removing unused plugins and themes
First of all, you want to deactivate and remove all unused plugins and themes. An unused plugin that is still activated is a waste of resources, as it is still loaded. Deactivated plugins and themes are not loaded, but they still may become a security risk if they are not updated.
The rule here is to use as few plugins as possible without
Cleaning up and Optimizing your Database
WordPress uses a database to store all it’s information such as the text you write in your posts or the settings you save. You could compare it to one big excel file with different tabs, and a lot of rows and columns filled with information.
Furthermore, a WordPress database may grow quickly, especially if you have a large site with a lot of posts and plugins. And a big database slows down your site, especially if you are logged in and can’t cache. There are a couple of specific features from WordPress that may grow your database quickly:
- WordPress saves revisions, back-ups, from your posts so you can revise to earlier versions.
- WordPress uses the database to store temporary data, called transients. Some plugins heavily rely on these and may store a lot of temporary data, which is not cleaned afterwards.
Using WP-Optimize for a Fast WordPress website
Again, a WordPress plugin comes to the rescue! The WP-Optimize plugin is developed for the single purpose of optimizing your database. So, install and activate this plugin through the Plugins Page of your WordPress Admin area. Then, click on the WP-Optimize item in the WordPress Admin Menu on the bottom left.
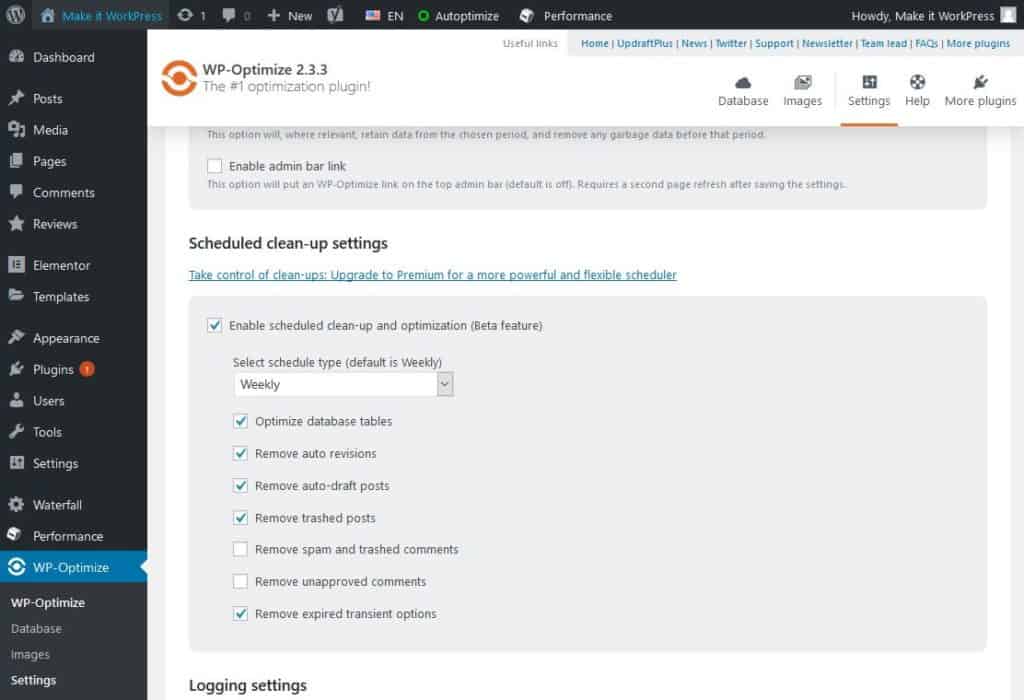
You will arrive at the settings screen where you can set-up scheduled optimizations. Enable it, and also make sure you thick Remove Expired Transient Options. If you want to optimize at an instant, you can go to the Database Tab on the right top and select any of the options to
Bonus: Enabling a Content Delivery Network
Have you heard of a Content Delivery Network, abbreviated as CDN? Basically, it means that the static parts of your website (in most case, these are the images and the scripts and styles we talked about earlier) are delivered from a server as close as possible to your visitors.
It is outside the scope of this article to explain it into detail, but basically a CDN service hosts some parts of your website on your own servers. Once a visitor from a certain location visits your website, some of this content is served over the closest CDN server.
This makes a CDN particularly useful in cases that you have a website with worldwide visitors. If your website only has local visitors, it is not strictly needed. But, a CDN may also save you some bandwidth for your original hosting, since the static parts are loaded through the CDN.
Cloudflare, a free CDN
One of the most famous, and free (yay!) CDNs out there is CloudFlare. And setting up a CDN with CloudFlare is actually quite easy:
- Sign-up for a new account at CloudFlare.
- In CloudFlare, add the domain for which you want to enable CloudFlare.
- Adjust the name servers at the place where you bought your internet domain (the registrar). This is different for each registrar, so you have to check it out how it works at your registrar.
- Wait for a maximum of 24 hours. CloudFlare is now working with your WordPress website.
One additional advantage of
Bonus: How to Analyse Your Website
Now we’re getting close to the realms of web developers and professionals. But nevertheless, it may help to know how to analyse your website (on performance, obviously) on a basic level.
Analyse Your Website Using Pingdom
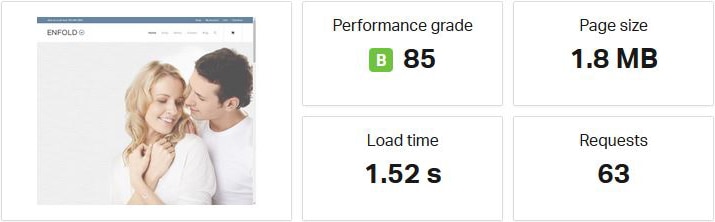
One tool which is widely used is the Pingdom website speed test. With Pingdom, you can test the speed of your website from various locations of the world. It is easy to use: you just have to enter your website and it will analyze it.
At first, it will show an overview of the results as shown above. Additionally, it will give a couple of recommendations for speeding up your website. By now, most of these recommendations should be fulfilled. If you implement this article, of course :).
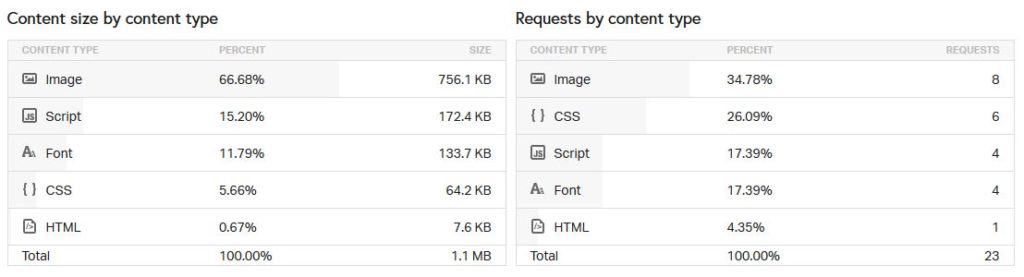
Subsequently, Pingdom shows the size and number of requests for various types of content (as shown above). For example, a major part of the page may be consisting of images. With this information, you may decide to compress images. And that already can result in a fast WordPress website!
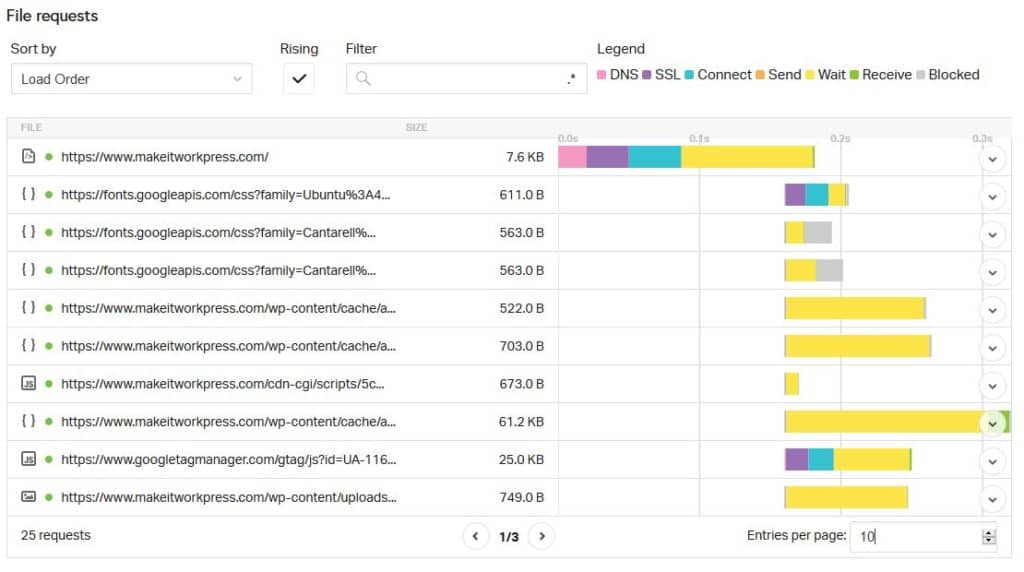
At last, a Waterfall graph is displayed. This shows how long it takes for the initial connection to your webpage (the first item), as well as loading all the images, scripts and stylesheets. From this, you can learn various things:
- If it takes a long time for the initial page to load, you may not have any caching. It is described earlier in this article.
- You may see scripts and styles from an external domain, such as a Google Analytics script. If these scripts take a long time to load, you may consider using other scripts.
- It also shows how many requests are needed to load a page. It is advised to lower this number as much as possible. So remove unneeded images, and use minification.
Other tools for analysis
There are a few other tools that you can use to measure whether your WordPress site is slow. These are widely used:
- Google Pagespeed Insights: especially shows if your website is already taking the right measures to load quickly.
- WebPageTest: Gives a detailed report on how quickly your website loads, including the so-called Time to First Byte.
- GTMetrix: Also gives a comprehensive report of the speed of your WordPress website, including the scores on various aspects.
Analysing Themes and Plugins
If you are a WordPress developer, there are a number of other tools available which may help you to analyze the website from the back-end. I won’t go further into detail here, but will mention these plugins:
- Usage DD: Monitors the memory used, the Time to First Byte (TTFB) and the number of queries. Useful if you want to see initial data, but not too many
- Query Monitor: Registers errors in code, hooks used, scrips registered and the number of queries. Useful to see if you can limit the number of queries to the database and look into detailed information.
These tools are especially helpful to see how heavy plugins and themes are. As a beginning WordPress professional, you may use these plugins, activate different themes and plugins and see what the effects on the numbers are. In this way, you can measure if a theme or plugin has a larger performance influence your website.
Back to Case: did we speed up WordPress?
Did you remember we had our test case? So, did we arrive at a fast WordPress website? Let’s discover what the results are after all our WordPress speed optimization.
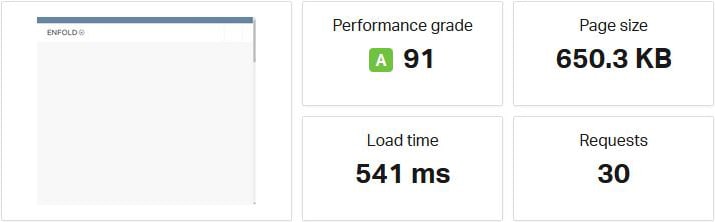
As you can see, we shaved almost 1,2mb from our page size. In addition, we limited the number of our requests from 64 to 30. Finally, we moved from a page loading time of 1.52 seconds to a page loading of 0,54 seconds. Mission accomplished!
And now we have come to the end of this article on WordPress speed optimization. Thank you for reading this elaborate article. If you have any questions or comments, do not hesitate to leave them below.